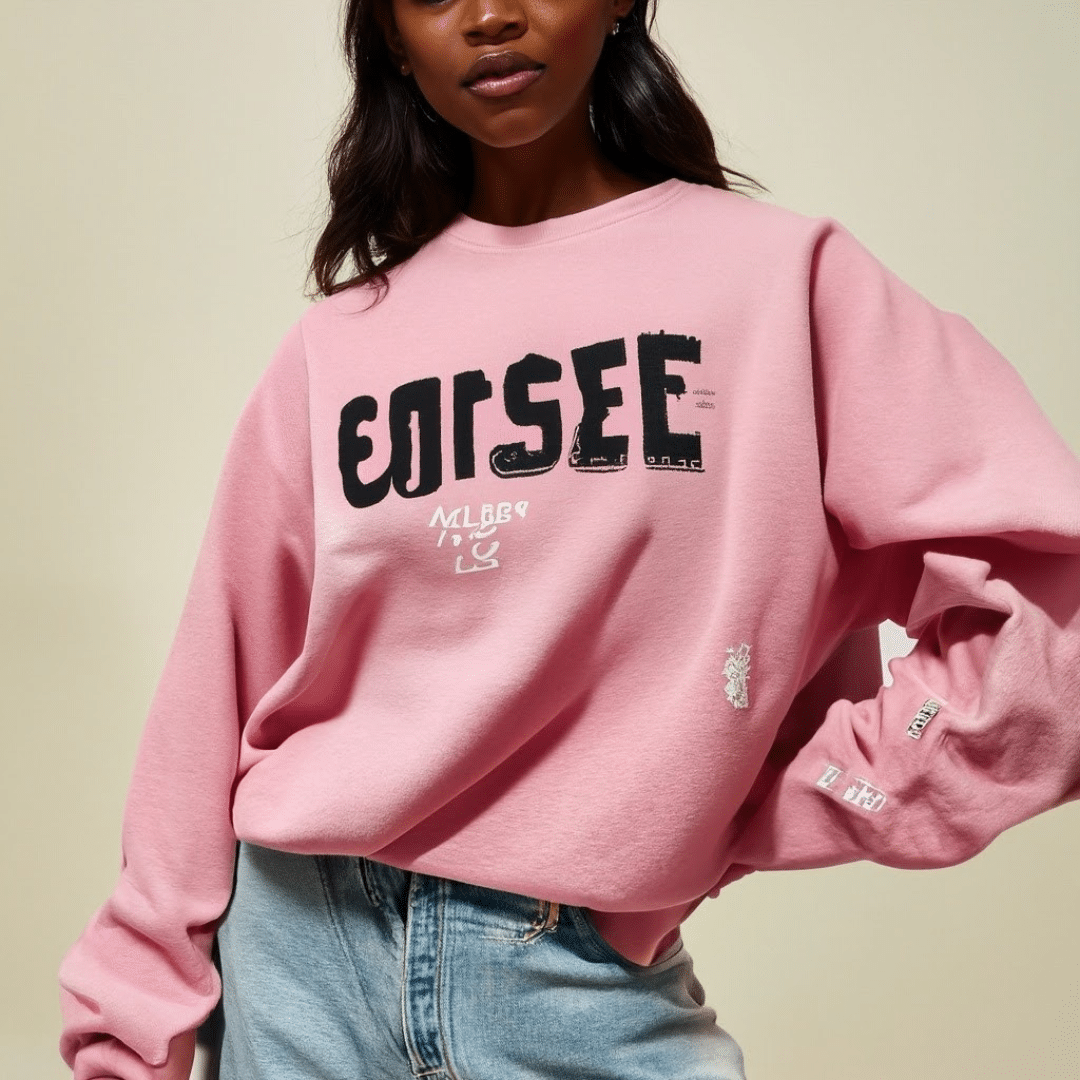
Are you tired of your plain and boring sweatshirts? Do you want to add some character and unique style to your wardrobe? Look no further! In this blog post, we will guide you through the process of how to distress a sweatshirt to achieve that trendy and effortlessly cool look. Whether you’re a fashion enthusiast or simply looking to revamp your old clothes, this step-by-step tutorial will provide you with all the information you need to transform your sweatshirt into a fashion statement. Get ready to unleash your creativity and give your sweatshirt a new lease on life!
What is Distressing?
Distressing refers to the process of intentionally aging or giving a worn-out appearance to a sweatshirt or any garment. By distressing a sweatshirt, you can create a stylish and vintage-inspired look that is increasingly popular in fashion trends. This technique involves different methods and techniques to achieve a distressed effect, providing a unique and personalized touch to your sweatshirt. Le’ts learn how to distress a sweatshirt!
Definition of Distressing
Distressing, in the context of fashion, is the deliberate manipulation of a garment to create a worn and vintage appearance. It involves various techniques such as cutting, ripping, sanding, bleaching, or using chemical treatments to achieve a faded and aged aesthetic. The overall goal is to give the sweatshirt a well-worn and lived-in look, as if it has been through many years of use and love.
Purpose of Distressing
The purpose of distressing a sweatshirt is to add character and style to an otherwise plain and ordinary garment. By distressing it, you can transform a basic sweatshirt into a unique and fashionable piece that reflects your individuality. Distressing allows you to create a vintage-inspired look, giving it a sense of history and nostalgia. It adds a certain edginess and personality to your outfit, making it a statement piece that stands out from the crowd.
Benefits of Distressing a Sweatshirt
Distressing a sweatshirt offers several benefits for fashion enthusiasts:
- Unique Style: Distressed sweatshirts offer a one-of-a-kind style that cannot be replicated with store-bought garments. Each distressed piece has its own distinct look and tells a story, making it a personal and unique addition to your wardrobe.
- Personalized Touch: By distressing your sweatshirt, you can reflect your creativity and personality. You have the freedom to choose the level of distressing and the techniques used, allowing you to create a customized piece that aligns with your fashion preferences.
- Vintage Appeal: Distressed sweatshirts exude a vintage charm that is highly sought after in fashion. They capture the essence of worn and well-loved clothing, providing a nostalgic touch to your ensemble.
- Versatility: Distressed sweatshirts can be styled in various ways to suit different occasions. They can be paired with jeans, skirts, or layered over dresses to create different looks ranging from casual to edgy or even bohemian.
- Budget-Friendly: Instead of spending a significant amount on buying already distressed sweatshirts, distressing your own allows you to save money while still achieving the desired look.
When distressing your sweatshirt, always remember to strike a balance between a well-worn appearance and maintaining the structural integrity of the garment.
How to Distress a Sweatshirt
When it comes to distressing a sweatshirt and giving it a cool, worn-in look, proper preparation is key. In this section, we will guide you through the important steps of choosing the right sweatshirt, washing and drying it correctly, and gathering all the required materials.
Choosing the Right Sweatshirt
To ensure a successful distressing process, it’s important to select the right sweatshirt. Look for a sweatshirt made of sturdy and durable fabric, preferably 100% cotton or a cotton-polyester blend. Avoid sweatshirts with delicate embellishments or intricate designs, as these may not withstand the distressing techniques.
Consider the fit as well. A slightly oversized sweatshirt can give you that effortlessly stylish and relaxed vibe. However, make sure it’s not too big, as it may hinder the distressing process.
Washing and Drying the Sweatshirt
Before you begin distressing your sweatshirt, it’s crucial to wash it first. This step helps remove any chemicals, dirt, or oils that may interfere with the distressing techniques. Follow these simple steps for washing and drying your sweatshirt:
- Turn the sweatshirt inside out to protect the outer surface during washing.
- Use a mild detergent and set your washing machine to a gentle cycle and cold water.
- Avoid using fabric softeners as they can leave a residue on the fabric.
- After washing, air-dry the sweatshirt by laying it flat on a clean surface. Avoid using a dryer, as the heat can shrink or warp the fabric.
Gathering the Required Materials
Before you begin distressing your sweatshirt, gather all the necessary materials. Here’s a list of commonly used tools and materials for distressing:
- Sandpaper or a pumice stone: These can be used to create a worn-out effect on specific areas of the sweatshirt.
- Scissors or a seam ripper: These will come in handy for creating intentional rips, tears, or frayed edges.
- Bleach or fabric dye: If you want to achieve a more unique and customized look, consider using bleach or fabric dye to alter the color of your sweatshirt.
- Safety pins or razor blades: These can be used to create distressed details like small holes or frayed threads.
- Spray bottle: Fill it with water to help achieve a faded and vintage look.
Make sure you have all these materials ready before you dive into the actual distressing process. Having everything within reach will help you stay organized and focused, leading to better results.
Remember, each distressing technique requires careful attention to detail and patience. By properly preparing your sweatshirt and gathering all the necessary materials, you are setting yourself up for success in the next steps of distressing. Stay tuned for the following sections, where we’ll explore various distressing techniques to transform your sweatshirt into a fashion statement.

Distressing Techniques
Distressing a sweatshirt is a great way to give it a worn, vintage look that adds character and style to your wardrobe. There are several techniques you can use to achieve this distressed effect. In this section, we will explore four popular methods: fraying the edges, sanding the fabric, cutting or ripping holes, and bleaching or acid washing. Each technique offers a unique approach to distressing your sweatshirt, allowing you to customize and create a one-of-a-kind look.
Fraying the Edges
Fraying the edges of your sweatshirt is a simple yet effective way to achieve a distressed look. To do this, start by carefully pulling out a few threads from the hem, cuffs, and collar of your sweatshirt. Gently unraveling these threads will create a frayed appearance, giving your sweatshirt a worn and rugged feel.
Sanding the Fabric
Sanding the fabric of your sweatshirt can create a subtly worn-out look. You will need sandpaper for this technique. Begin by laying your sweatshirt on a flat surface and lightly sanding the surface of the fabric using the sandpaper. Focus on areas that naturally experience more wear and tear, such as the elbows, cuffs, and collar. This process will soften the fabric and create a slightly faded appearance, contributing to the distressed effect.
Cutting or Ripping Holes
Cutting or ripping holes in your sweatshirt is a more edgy and rebellious approach to distressing. You can use scissors to carefully cut small holes or make larger slashes in strategic areas of your sweatshirt. Another option is to create a distressed look by tearing the fabric with your hands. Be cautious and start with small cuts or rips, as you can always make them bigger if desired. This technique adds an element of punk-inspired style to your sweatshirt.
Bleaching or Acid Washing
Bleaching or acid washing your sweatshirt can create a unique, faded and worn appearance. To achieve this effect, mix bleach with water in a spray bottle and lightly spritz the sweatshirt. Alternatively, you can dip a brush in bleach and gently flick it onto the fabric to create a speckled effect. Remember to wear protective gloves and work in a well-ventilated area when using bleach. Acid washing follows a similar procedure, but instead, you use a mixture of water and hydrogen peroxide. Both methods give your sweatshirt a vintage, distressed look with a hint of a lived-in feel.
These distressing techniques offer a range of options for customizing your sweatshirt. Whether you prefer a subtle worn-out effect or a more bold and rugged appearance, experimenting with these techniques will allow you to create a distressed sweatshirt that reflects your personal style.
Distressing Specific Areas
Distressing a sweatshirt can add a unique and worn-in look to your garment. By focusing on specific areas, such as the neckline, sleeves, and hemline, you can create a distressed effect that adds character and style to your sweatshirt. Let’s explore how to distress each of these areas:
Distressing the Neckline
To distress the neckline of your sweatshirt, you can use various techniques to achieve a worn and frayed look. Here’s how:
- Cutting: Take a pair of sharp scissors and make small snips along the edge of the neckline. Be careful not to cut too deep or too close to the seam. Aim for an uneven and frayed appearance.
- Pulling: Gently tug at the cut edges to create a more distressed effect. This will further enhance the frayed look and give your neckline a worn-in vibe.
- Sanding: Use a piece of sandpaper to lightly rub the edges of the neckline. This will create a rougher texture and add to the distressed appearance. Be cautious not to overdo it, as excessive sanding may damage the fabric.
Distressing the Sleeves
Distressing the sleeves of your sweatshirt can give it a trendy and edgy look. Here are some methods you can try:
- Cuff Fraying: Roll up the sleeves and make small cuts along the edges to create a frayed effect. Remember to keep the cuts uneven and random for a more natural distressed look.
- Bleaching: Apply a small amount of bleach to a sponge or cloth and lightly dab it onto the sleeves. This will create a faded and distressed appearance. Remember to protect your hands and work in a well-ventilated area.
- Rubbing: Use a pumice stone or sandpaper to gently rub the sleeves in a circular motion. This will create a worn-out texture and give your sweatshirt a distressed look. Be careful not to rub too vigorously, as it may damage the fabric.
Distressing the Hemline
Distressing the hemline of your sweatshirt can add a touch of ruggedness and style. Here’s how you can achieve it:
- Fraying: Using a pair of scissors, make small vertical cuts along the bottom edge of the sweatshirt. Pull at the loose threads to create a frayed effect. You can also use a seam ripper to create deliberate frays.
- Distressed Edges: Use sandpaper or a pumice stone to gently rub the hemline area. This will create a worn-in appearance and give your sweatshirt a distressed vibe. Be cautious not to overdo it and cause damage to the fabric.
- Dyeing: If you want to add a pop of color to your distressed hemline, consider using fabric dye. Follow the instructions on the dye package and create a unique and personalized distressed look.
Remember, distressing specific areas of your sweatshirt requires careful attention to detail. Experiment with different techniques and have fun creating your own distressed style.
Optional Distressing Techniques
When it comes to distressing a sweatshirt, there are a variety of techniques you can use to achieve a unique and worn-in look. In this section, we will explore three optional distressing techniques: Adding Paint Splatters, Applying Fabric Dye, and Embellishing with Patches or Studs. Each technique offers a different way to customize your sweatshirt and give it a cool, vintage-inspired aesthetic.
Adding Paint Splatters
Adding paint splatters to your sweatshirt is a fun and creative way to give it an edgy and artistic vibe. You can use fabric paint in various colors to create a splatter effect that mimics the look of an old, well-worn garment. Here’s how you can do it:
- Lay your sweatshirt on a protected surface to avoid getting paint on anything else.
- Choose your desired colors of fabric paint and pour them into separate containers.
- Dip a paintbrush into one of the colors and hold it over the sweatshirt.
- Use your finger or another brush to flick the bristles of the brush, causing the paint to splatter onto the sweatshirt.
- Repeat this process with different colors until you achieve the desired splatter effect.
- Allow the paint to dry completely before wearing or washing your sweatshirt.
Applying Fabric Dye
Fabric dye is another fantastic option if you want to distress your sweatshirt with color. It can give your garment a beautifully faded or tie-dye effect, depending on the technique you choose. Follow these steps to dye your sweatshirt:
- Fill a large basin or bucket with hot water and add the fabric dye according to the instructions on the dye package.
- Wet your sweatshirt thoroughly to ensure even dye absorption.
- Place the wet sweatshirt into the dye bath and stir it gently with a spoon or tongs to distribute the dye evenly.
- Let the sweatshirt soak in the dye bath for the recommended time, usually around 30 minutes to an hour.
- Remove the sweatshirt from the dye bath and rinse it under cold water until the water runs clear.
- Hang the sweatshirt to dry, and once it’s completely dry, you can wash it separately to remove any excess dye.
Embellishing with Patches or Studs
If you want to add some extra flair to your distressed sweatshirt, consider embellishing it with patches or studs. This technique allows you to personalize your garment and make it truly unique. Here’s how you can do it:
- Choose patches or studs that match your desired aesthetic. You can find them in craft stores or online.
- Lay your sweatshirt on a flat surface and position the patches or studs where you want them to be placed.
- If using patches, use a needle and thread to sew them onto the sweatshirt. If using studs, follow the instructions provided with the studs to attach them securely.
- Be creative with the placement and arrangement of the patches or studs to achieve the desired look.
- Once you have attached all the patches or studs, give your sweatshirt a final inspection to ensure everything is secure.
- Wear and enjoy your newly embellished, distressed sweatshirt!
By utilizing these optional distressing techniques such as adding paint splatters, applying fabric dye, or embellishing with patches or studs, you can transform a plain sweatshirt into a unique and fashionable piece. Experiment with different combinations and unleash your creativity to achieve the perfect distressed look that matches your personal style.
Finishing Touches
Now that you’ve distressed your sweatshirt to perfection, it’s time to give it the finishing touches. This involves washing the sweatshirt, as well as properly drying and ironing it. These steps are crucial to maintain the distressed look and ensure the longevity of your newly transformed sweatshirt.
Washing the Distressed Sweatshirt
When it comes to washing your distressed sweatshirt, it’s important to follow a few guidelines to prevent any damage or fading. Here’s what you need to do:
- Turn the sweatshirt inside out: To protect the distressed areas from rubbing against other clothing or the washing machine drum, it’s best to turn the sweatshirt inside out before washing.
- Choose a gentle cycle: Opt for a gentle or delicate cycle on your washing machine. This will help preserve the distressed details and prevent excessive agitation.
- Use a mild detergent: Avoid harsh detergents that can strip away colors or degrade the fabric. Instead, use a mild detergent specifically formulated for delicate garments.
- Wash with like colors: To prevent any potential color bleeding, it’s advisable to wash your distressed sweatshirt with similar colors. This will help maintain its vibrant look.
- Skip fabric softener: Fabric softeners can leave a residue that may dull the distressed details. It’s best to skip this step and allow the sweatshirt to maintain its unique texture.
- Air dry if possible: To avoid any potential shrinkage or damage from high heat, consider air-drying your distressed sweatshirt. Lay it flat or hang it up, ensuring it is well-supported to preserve its shape.
Drying and Ironing the Sweatshirt
After washing, it’s time to move on to the drying and ironing process. Follow these steps to ensure your sweatshirt retains its distressed charm:
- Gently wring out excess water: Before drying, gently wring out any excess water from the sweatshirt. Avoid twisting or wringing too forcefully to prevent stretching or distorting the fabric.
- Air drying method: To maintain the distressed look, it’s best to air dry your sweatshirt. Lay it flat on a clean towel or drying rack, making sure it is in its original shape.
- Avoid direct sunlight: If you’re drying your sweatshirt outdoors, try to find a shaded area. Direct sunlight can cause colors to fade and may alter the distressed details.
- Iron on low heat (if needed): If your sweatshirt requires ironing to remove any wrinkles or creases, use a low heat setting. Remember to place a thin cloth or pressing cloth in between the iron and the sweatshirt to protect the distressed areas.
- Iron around distressed details: Be cautious while ironing around the distressed areas, as excessive heat or pressure can flatten or damage them. Instead, gently iron around the details to smooth out any wrinkles.
By following these steps, you’ll ensure that your distressed sweatshirt remains in prime condition, ready to be worn and admired for its unique style. Remember, proper care plays a vital role in maintaining the authenticity of your newly distressed garment.
Conclusion
In conclusion, distressing a sweatshirt can be a fun and creative way to add some personality to your wardrobe. By following the steps outlined in this blog post, you can learn how to distress a sweatshirt easily, and achieve a stylish and unique distressed look. Remember to start by choosing the right sweatshirt and gathering the necessary tools. Then, use techniques such as sanding, cutting, and bleaching to create the desired distressed effect. Finally, don’t forget to wash and dry your sweatshirt to complete the distressing process. With a little time and effort, you can transform an ordinary sweatshirt into a trendy fashion statement. So go ahead, get creative, and enjoy the process of distressing your sweatshirt!
Share this
Popular products
-
 Women's Mystery Shoe Box
$175.00 – $1,000.00
Women's Mystery Shoe Box
$175.00 – $1,000.00
-
 Men's Mystery Shoe Box
$175.00 – $1,000.00
Men's Mystery Shoe Box
$175.00 – $1,000.00
-
 5 Item per month
$74.00 / month
5 Item per month
$74.00 / month
-
 10 Item per month
$125.00 / month
10 Item per month
$125.00 / month